Table of Contents
Introduction
Organisational Messages in 365 are a method of deploying a notification of several varieties to your organisations managed devices.
These were originally available in various locations across 365 platforms (Such as from Intune or Usage Reports), however, these have now all been moved to the 365 admin center and can be accessed by going to the 365 admin center and selecting Reports> Organisational Messages.
Requirements
While there are currently no licensing requirements in place for using organisational messages, there are some requirements for the accounts that are going to be creating these messages, and also some requirements on the devices they are being displayed upon.
The first requirement is on the account creating the messages, this account will either have to be a global administrator or have the ‘”Organizational Messages Writer” role assigned.
To approve messages that have been created the account in question will again need to be a global administrator or have the “Organizational Messages Approver” role assigned.
It is worth noting at this point that when creating a custom message, the account that created the message cannot approve it, regardless of which role is assigned. This means you will need at least one additional account with one of the above roles in place to push out custom messagesÂ
Once the required accounts have the correct roles assigned you will then have to ensure your devices have the correct settings applied. These settings can be deployed via a Settings Catalog configuration policy in Intune.
To update this setting on your managed devices either adjust an existing settings catalog policy or create a new one and give it an appropriate name, then add a new setting and search for ‘Enable Experience’. Doing so will show the Experience category, once selected you can then select the ‘Enable Delivery of organizational messages (User)’. Select this setting, enable this and then save the policy.
Once the above is applied to your endpoints they can then receive and display organisational messages you create in the 365 admin center. However, this only applies to the Taskbar and Notification area messages, Spotlight messages have additional requirements.
Types of Messages
When creating a new organisational message you will first be greeted with a selection of objectives for your new message, this includes options like service health, Adoption, Training, and updates.Â
However, these options have little to no impact on the options you have available to you and instead, adjust what templates you will see when they are made available.
Your next selection will be the type of message that you would like to send, this will determine how the message of choice is displayed to your end users and therefore you should consider which option would be best for you and your organisation’s users to ensure the message is received
The first of these options is a notification area message, this type of message will appear for the user just above the system tray on the bottom right-hand side of their desktop and also appear in the notifications area if they open this
Next is the taskbar message, which will display a similar message as the notification area, however, this will be displayed just above where your Windows icon is displayed. By default this will be the center of the taskbar however for users that set this to be aligned to the left, the message will be displayed there instead.
As this message is more central on the screen (by default) it is much more prominent and can grab the user’s attention easier.
The final message type is the spotlight image, which will display your custom message in the selected area within Windows Spotlight which is on the user’s lock screen.
While this message type does allow for the most customisation and allows you to display messages on the lock screen, it does also have some additional requirements for the managed devices you want to display these on.
This will require you to ensure that some of the Windows Spotlight settings are set to ‘Not Configured’ instead of ‘Block’ to allow the message to be displayed. The exact settings that need to be returned to ‘Not Configured’ are:
- Windows Spotlight
- Windows Spotlight on lock screen
- Windows Tips
- Windows Spotlight in action centre
- Windows Spotlight in personalisation
Creating a Message
After you have selected your message type you can then move on to crafting your message, the first step in which is selecting a message template or custom message.Â
A message template option will only be available when Microsoft releases some templates, and therefore to start with you will likely only see the custom message option.
Notification Area Messages
The first available option is the Notification Area and messages, when selecting this option you will then be able to provide a message Title, Body, Link URL and a Logo image.
The link URL will open the provided web page when the message box is clicked on. The image file is required to be 48×48 pixels and must be a .PNG or .JPEG file.Â
When you provide a logo for the Organisational messages it will be saved and used as the default logo for all future messages until you replace it, saving you from uploading the same image multiple times.
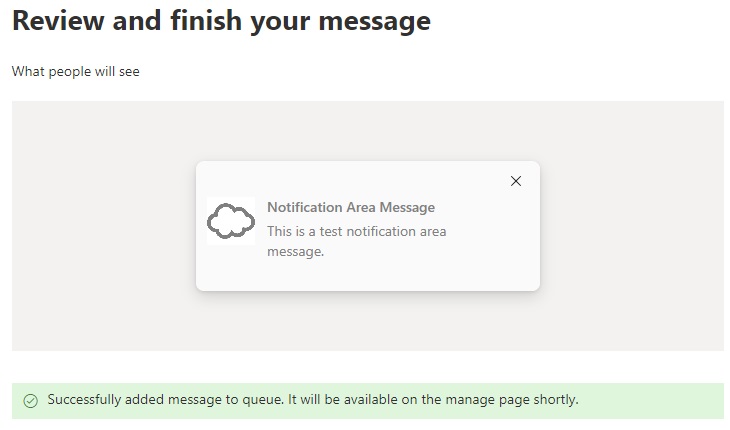
While Crafting your message you will notice that the preview section on the left updates itself and shows roughly what the message will look like on the end user’s device
Below you can see what this test message looked like once it was delivered. The notification area messages do appear to be quite small and fairly easy to miss, that being the case they would be less useful for urgent communications, but perhaps more applicable for notifications related to company updates or features where it does not need to be distracting.
Taskbar Area Messages
Second, is the Taskbar Area and messages, when selecting this option you will then be prompted for the same information as the notification messages, the main difference being that you now also have a button to name as well.
This button will now act as the link to the URL that you provide in your message and can be selected by the end user, or they can select not now to ignore the message
The link URL will open the provided web page when the message box is clicked on.Â
The image file is required to be 64×64 pixels and must be a .PNG or .JPEG file.Â
Similar to the Notification message, once you provide a correctly sized logo, the same logo will be used by default the next time you select to create a Taskbar message.
Once more, while you are crafting your message, the preview on the left will continue to update to show you roughly how the message will appear once complete.
Below you can see what this test message looked like once it was delivered. The taskbar message also appears to be quite small, however, as it is central to the screen and requires user interaction to clear, It is much more prominent and therefore may be more suitable if trying to relay urgent messages.
While this can be considered a good thing, a distracting message can also be a bad thing if the message is not something that is required by the end user, and therefore may not be the best approach to advertising something new in the company (such as internal news or a new web portal etc).
Spotlight Messages
Lastly is the Spotlight messages, when selecting this option you will then be prompted for similar information as that of a notification area message, however this time there is no Logo or a button to provide a name for.
The link URL will open the provided web page when the message box is clicked on after the user signs back into their device from the lock screen that spotlight is displayed on
Instead of having to provide a logo, for Spotlight messages you need to provide a background of the Spotlight screen, therefore the image you need to provide for this one needs to be 1920×1080 pixels, the format needs to be .png or .jpg, and the dpi resolution needs to be at least 300.
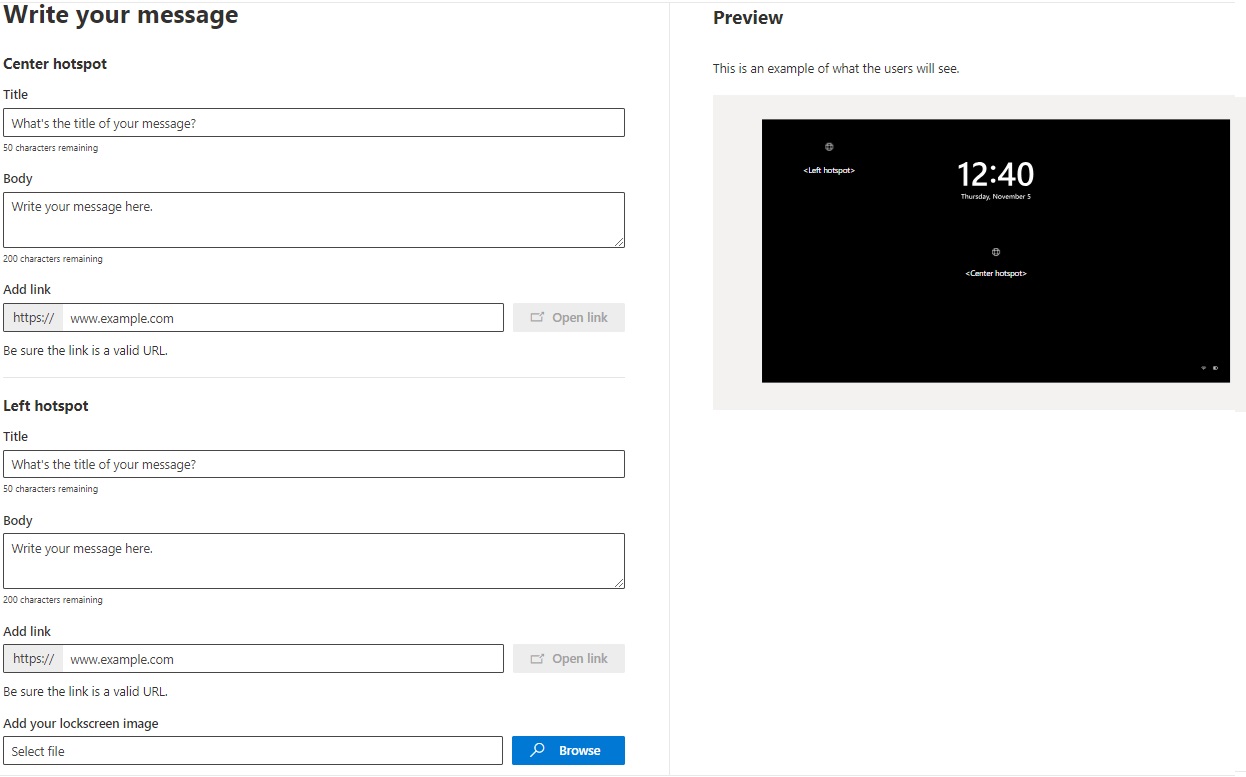
Another option in the Spotlight message is a choice in the area that you want to show your message, here you have the option to select either the center or (top) left spotlight. You can choose either option or both options and provide a unique title, message and link for each.
Similar to the other message types, once you provide a correctly sized background image, the same one will be used by default the next time you select to create a spotlight message.
Once more, while you are crafting your message, the preview on the left will continue to update to show you roughly how the message will appear once complete.
Once you have completed filling in the details for your message, and you are happy with the way that this appears in the preview, you can move on the the deployment details, or you can select to save the message as a draft and return to this at a later date.
Assignments and schedules
Now that the message has been created, you will need to select which of your users will see this message and how often they will see the message.Â
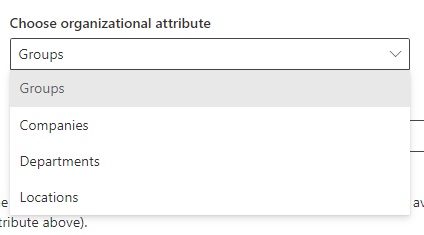
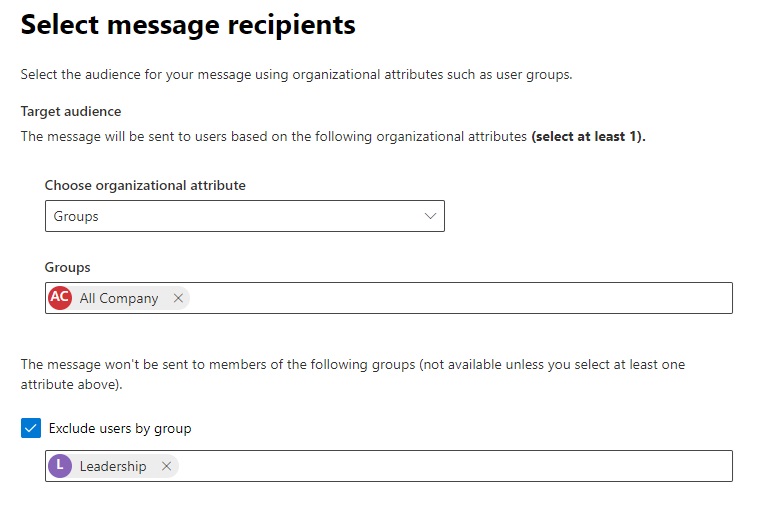
On the first of these pages, you will select your target audience, for which you have 4 options:
- Groups
- Companies
- Departments
- Locations
Selecting the groups option will allow you to target any group that you have previously created in your tenant, and the message will be sent to only their devices
However, the other options are only available through the use of advanced targeting which requires the filters to be made available through group-level insights
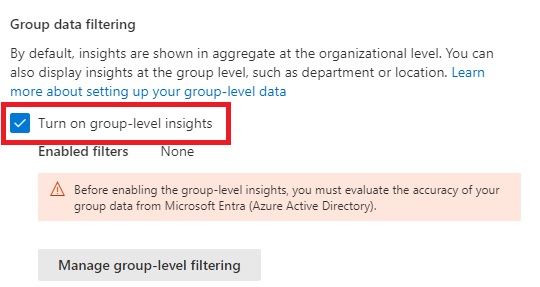
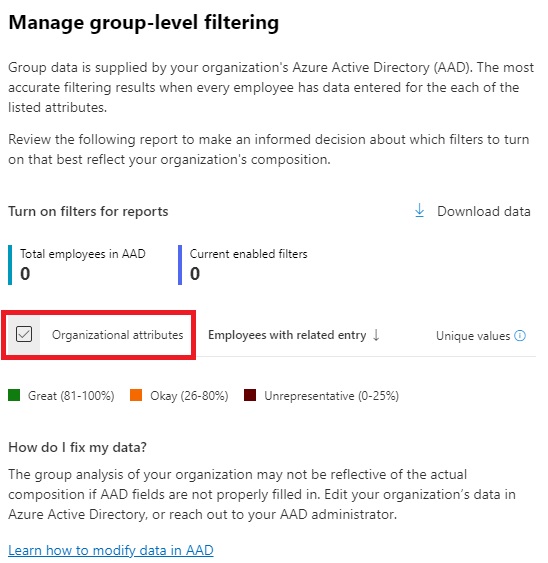
To enable the advance targets go to your 365 Admin centre and select Settings > Org Settings > Adoption Score. You will then find a check box for Group Lvel Insights at the bottom of the section on the right.
If this is the first time you have enabled this you will first have to configure the filtering which can be done using the button underneath your filters.
From the new section, you can select the ‘Organisational Attributes’ option which will enable the additional filters for your messages.
These filters are based on your user’s attributes in Entra ID, if you do not have a large enough sample size (i.e. users with their attributes filled out) then the filter will be inaccurate, if this is the case you will receive a warning suggesting that the data will not be correct and prevent you from enabling the filter until the issues have been resolved.
Once you have selected your Audience type you can select the target itself, as well as select a group that you wish to exclude from the message, allowing you to filter your previous selection a little.
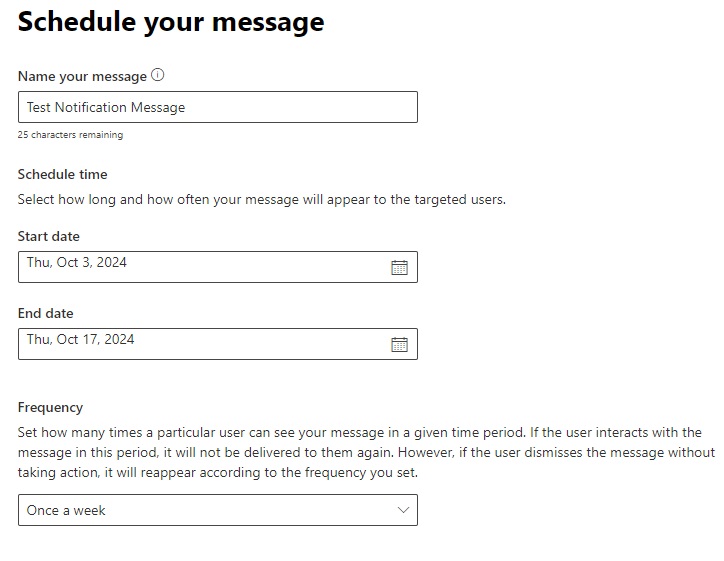
Next, you can select the timeframe in which your new message will be deployed to your end users, however, the first option on this page is to name the message. This is just the name that will be displayed on the organisational message page so ensure that you are giving this a name that explains what this is for specifically.
You can then select the start and end date for your message, this can be triggered on the same day, the minimum timeframe that can be set is 1 week, and there does not appear to be a limit of how long you can have a message running for.
The final option on this page is the frequency in which the message will be displayed for your users, the options that you get here are:
- Once a week
- Once a month
- Twice a month
- Weekly four Times
- Weekly ten times
- Tri-weekly Once
Something worth noting about the frequency however is that the message will only continue to be displayed until the user interacts with the message itself. Meaning if the user clicks on the message (or button) and follows it through to the link that is provided, the message will be considered delivered and therefore will not be shown again to that user.
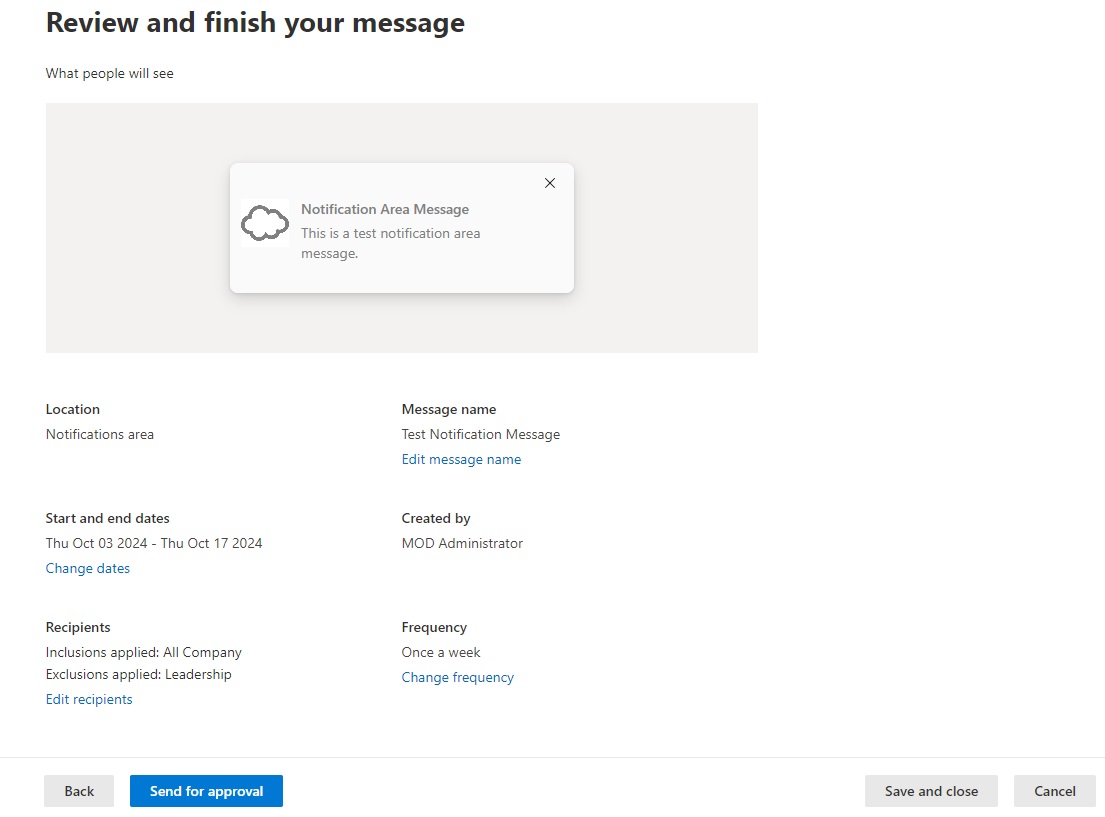
The final page is the review and finish page, here you can go over the details that you have put in place, see the preview for the message in question and quickly make any required adjustments before completing the process.
Once you are happy with the message select the ‘Send for Approval’ button, this will then mark the message for approval from another permitted user account.
The message will not be delivered to any users until it has been approved unless you use a message template, this includes Urgent messages as well. So if you have another user that needs to check on this it would be best to inform them that this needs to be done.
Approvals
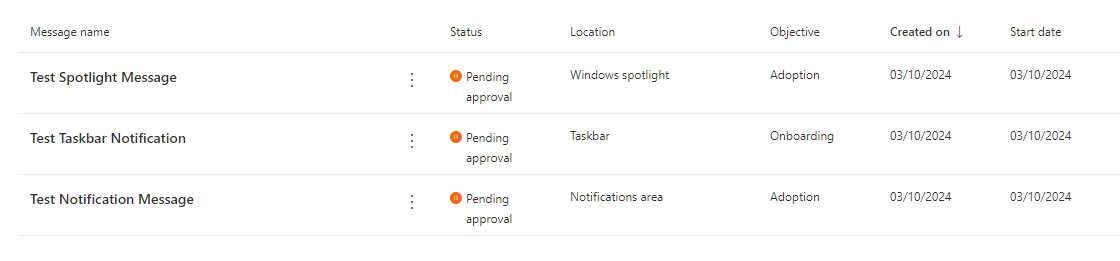
Once a custom message has been completed its status on the Organisational Message page changes to ‘Pending Approval’ and the message will remain in this state until it has been rejected or approved.Â
You can also copy a pending message however this will also require approval before it can be deployed.
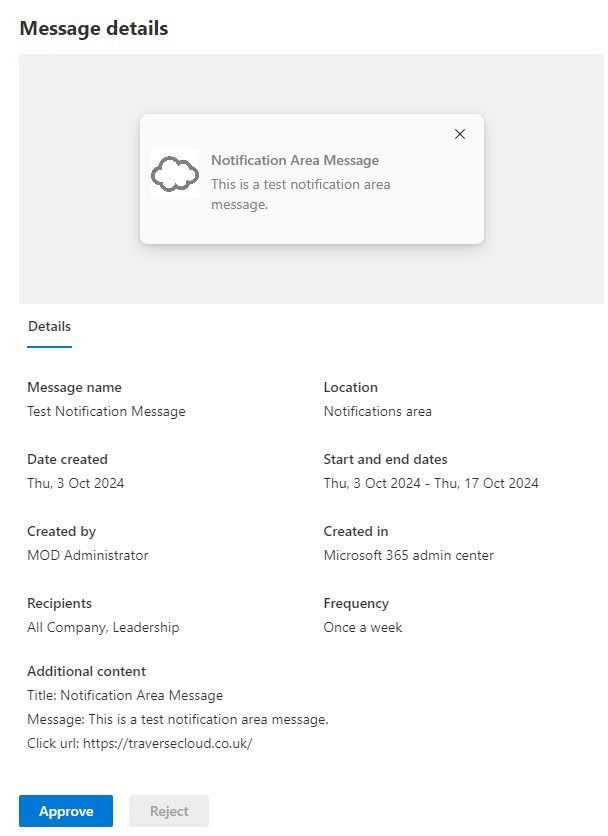
To approve a message you will need to click on the message name.
Once you have selected the message name you will be shown the message details from the creation process so that they can be reviewed. If the logged-on account did not create the message that is being reviewed you be given the option to approve or reject the message.
If the message that is being reviewed was created by the logged-on account the approval options will not be shown and you will only be able to review the message.
After the message has been reviewed, you can then approve the message which will start the deployment process using the settings that were shown. If reject is selected the message will not be deployed and its status will be changed to rejected on the Organisations messages page.
When deciding to approve or reject the message in question, you also have the option to add notes to the message which can be used to justify the decision.Â
This can be especially useful when rejecting the message so that the creator can review the reasons behind the rejection, and then make adjustments accordingly.
What’s Next?
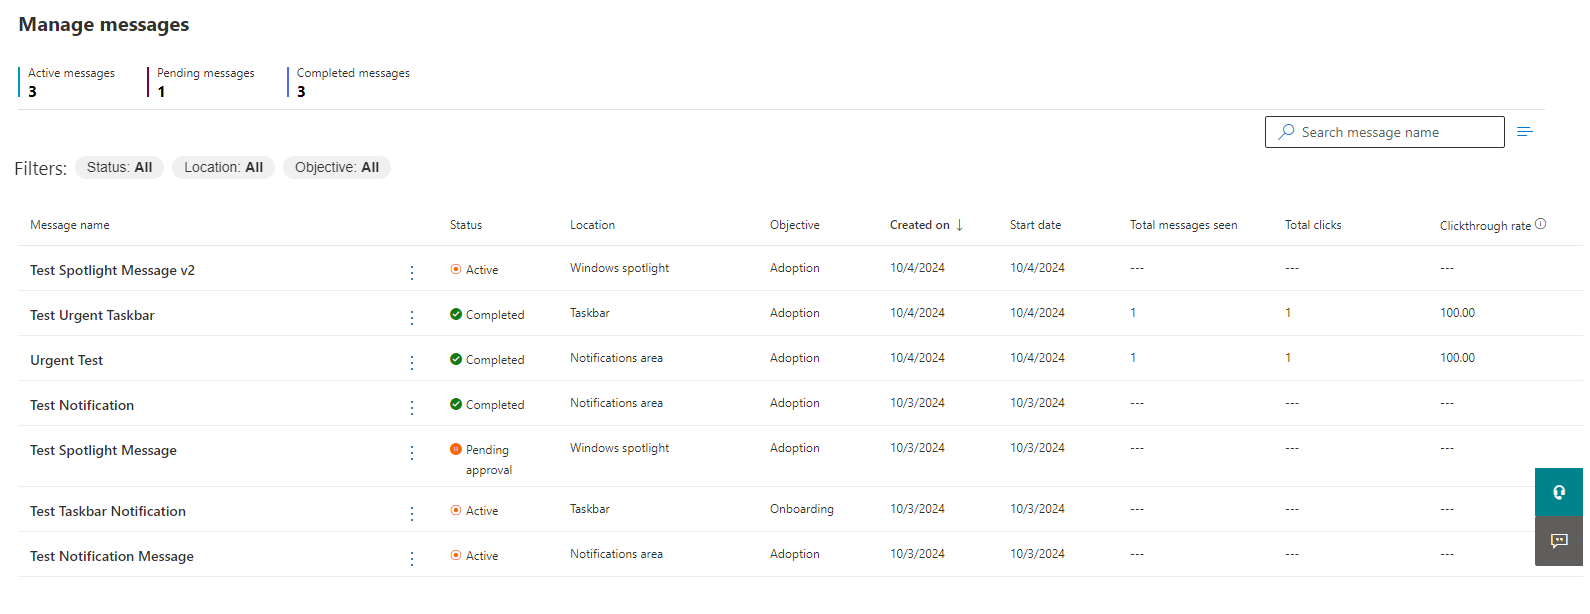
Once you have your message approved its status will change to active to suggest that the message is still currently being deployed to end users. Once the message has passed its end date, or when all users have interacted with the message its status changes to Completed and the message will not be shown to any further users.
On the organisational message page, you will be shown all of the current messages and their statuses.Â
You will also be able to see the number of times the message has been seen, the total number of times the message has been clicked on, and the click-through rate, which is the number of times the message has been clicked divided by the number of times it has been seen. This can be used as a very general idea of how effective your message has been.
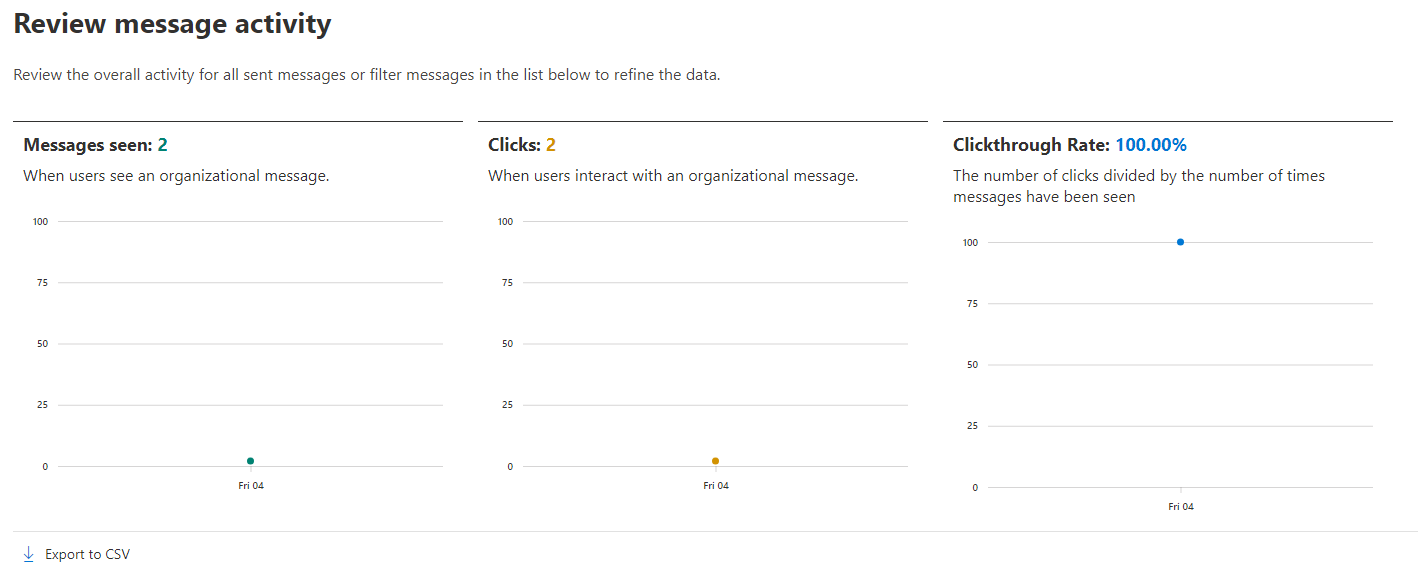
There is also the option to review the message activity, this will take you to a new page. The table at the bottom of the page is the same details that are shown on the main page. The top of the page will show similar stats however this is the stats for all messages that have been deployed.
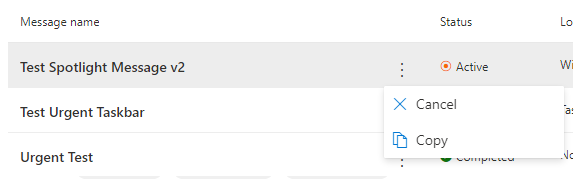
While on the main page, you have several options when selecting the messages, for Active messages you can either cancel the message, which will stop the message from being shown to users. The second option is to copy the message which creates a new message with the same details as that which was selected.
The options for a completed message are to copy and delete the message, deleting the message will remove it from the messages list and remove its stats from the review activity page.
Finally, the options available for a pending message are to copy and withdraw the message. Withdrawing the message will change the message status to withdrawn and prevent another user from approving the message. Withdrawn messages are the same as rejected messages and can be adjusted and sent for approval again.
Considerations
Frequency
Upon testing an urgent message was delivered to an end user within an hour of the message being approved making this a fairly reliable method of getting a message out to your users quickly.
When testing with a standard message however it takes substantially longer. As the minimum timeframe is one week, the highest frequency possible is ‘weekly 10 times’, using these settings it may take some time before you users see the message.
Urgent Messages
Urgent messages can be quite helpful in relaying important information to your end users in a timely fashion. However, they do have slightly different options available to them than a standard message.
The first difference is that urgent messages can only be deployed using the Notification or Taskbar area message types, Spotlight messages are not an option. This does make sense however as spotlight messages are less likely to be seen or interacted with.
Another key difference is that when creating an urgent message there are no timeframe options available, instead you can only select the audience. While this is very helpful when you are trying to alert end users of something of an ongoing issue or event, can be a draw-back if trying to pre-emptively configure a message to be deployed.
The way around this would be to first create the urgent message, however once completed wait to approve the message until it comes to the time in which you want it to be deployed. All details and settings will be kept the same, as when it was created.
Spotlight Messages
Spotlight messages have a lot more options when it comes to the message(s) they can display, as this allows you to display a full-screen image that can be very good at advertising new products and features within your organisation such as a new web portal or even updates within the company.
However, as this uses the spotlight sections on the lock screen the user must first be on the lock screen to see it. While the lock screen is something many users will see from time to time, it is not something that every user is guaranteed to view regularly.
Therefore Spotlight messages should be avoided if the messages and details within are something that needs to be seen by the end user, as there is no guarantee they will see it on a spotlight message.Â
Summary
Organisational messages in 365 have recently been moved from Intune to the 365 Admin Centre.Â
These messages can be very useful in both delivering urgent notifications to your end users regarding upcoming or ongoing issues, and they can also be helpful for informing users of upcoming changes within the organisation.
Crafting these messages is also a very quick and easy task to complete as long as the involved administrators are aware, however, some care should be taken to ensure that you are not creating an unnecessary distraction for your end users, so ensure that you are approaching each message with an appropriate message type and frequency.
Author: Curtis Cannon
My name is Curtis, I am a service engineer for an MSP. My focus is on specialising on Azure/Entra ID and other related cloud technologies found in the Microsoft 365 Suite. This content has been written from my own knowledge on the subject in question, and any opinions given throughout the post are mine and do not represent the opinion of others.
Related Posts
Deploy Network Printers and Drivers Using Intune
In this post, you will learn how you can utilise Microsoft Intune to deploy local network printers and their associated drivers to your managed devices.
Sending Organisation Wide Messages in 365 Admin Center
In this post I will cover Organisations message in the 365 Admin Center and how they can be used to streamline notification delivery to end users.
Generate a Device Compliance Report Using PowerShell
In this post I will share a script I have created to generate a report of all managed devices compliance status which will help give you an understanding of which devices need remediating, removing, or have their policies adjusted.
