In this post we will be using Account Security settings in Intune to deploy users and groups to the local Administrators group on your managed Windows devices. While we will be looking primarily at pushing out local admin accounts, this same method can be used to push out your domain users to any of the local groups on your managed devices.

Why use Account Security?

There are several methods which can be used to push out local administrator accounts to your managed Windows devices so the question of which tool to use will be one of the first challenges to face when looking to complete the task. While the end result is usually the same, what options you have after the accounts have been pushed out is what sets them apart.

After an account has been added to a local group of a device you may need to return to the policy to change the accounts or groups that are being deployed, doing this with the other methods is something that can be accomplished, but may require more time, and a better understanding of the deployment method which may be lacking if someone other than the policy creator takes on the task.

With account security however you can adjust the policy that is assigned to your devices with ease, adding new members and removing old members is just a few clicks on the policy and then once saved the devices will update the local groups when they next check in, making this a much more simple and efficient choice when it comes to adjusting your local group memberships

Creating a new policy

You can find the Account Security page within the Intune Admin center, this is located within the Endpoint Security Tab under Account Security (Or use this Link)

From here you will be able to see any of the existing policies that may have been created. To create a new policy simply select ‘Create Policy’ at the top of the page. You will then be presented with a new section on the left asking for the Platform you plan to apply this to and the type of profile you intend to create. For the purposes of adding a new local admin account (or any local group membership), you need to select ‘Windows 10 and later’ and then ‘Local user group membership’

This will take you to a new page to create your Account Security profile, to start you will need to add a Name and a Description for your policy. As with any other policy it is strongly advised that you give the policy a name and a description that clearly shows what the policy is used for to avoid any confusion with other future policies when/if others view them. Once done select ‘Next’ to continue.

Configuration Settings

Once you have the basic details for your account configured it’s time to move on to the settings that will determine what it will do. On the configuration settings page, you will be presented with several columns with a drop-down for each. The first is the ‘Local Group’ column which is used to determine which of the local groups on the device you will be modifying. The key group here (and the one we will be using for this example) will be the Administrators group, however, you can also select to add users and groups to other local groups such as Guests and Remote Desktop Users.

Next is the ‘Group and user action’ column, this is used to determine what action you will be taking on the selected local group, the options are as follows:

  • Add (Update):-
    This option is used to add new users or groups to the selected local group without modifying the members of the local group that are already present
  • Remove (Update)
    This option is used to remove the selected users or groups from the affected local group. You can use this option to revert settings deployed by previous policies or remove local group members that may have existed prior to the device enrollment
  • Add (Replace)
    This option is similar to ‘Add (Update)’ however this option will remove the users and groups that were previously in the affected local group and then add the new identities you select in their place

For this example we will use the ‘Add (Update option )’ as we are planing to simply add a user/group to the local admin group.

Next is the user selection type, this is simply selecting the input method you would like to use to add the identities to the local group. The 2 options are ‘Users/Groups’ and ‘Manual’.

The first option will allow you to select users and groups that are currently present in your 365 directory and will likely be the most common method used to push out accounts to managed devices, simply click on the ‘Select users/groups ‘ link next to the drop down, and then search and select the accounts you would like to be added/removed.

The other option is ‘Manual’, which will allow you to manually enter the details of the account using either the username, domain\username or SID format. While not as simple as simply selecting a group from a menu, it can be used to add or remove accounts that are not managed from your 365 tenant or even the built-in accounts that use common SIDs

For the purposes of this example we will be using the ‘Users/Groups’ option to add a group called ‘SG – Local Device Admins’.

Once you have completed the settings for the first modification to local groups you can then add additional modifications within the same policy. This is done by selecting the ‘Add’ button at the top of the page. In doing so this will allow you to make multiple modifications to the same or even various groups, each with their own action types

Using this method you could then add and remove users/groups from multiple local groups within the same policy, which in turn will create less clutter on the Account Security page as you create more policies.

The final steps...

Once you have your settings in place it’s time to move on to the Scope Tags and Assignments. As with most other policies available within Intune you can assign a scope tag to an Account Security policy to restrict access and management of the policy to just those within the Scope Tag.

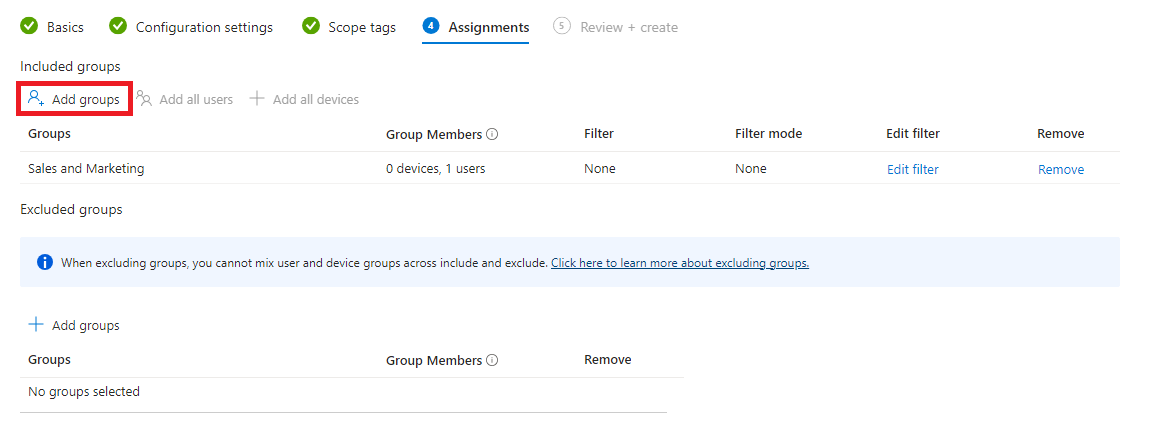
Then once you have selected you Tag your can move on to Assignments, this is the section where you select which users, groups, or devices to add your policy to. To add an identity to the assignments use the add options under the ‘Included Groups’ section and add the identities you intend to have this policy effect. 

Within the assignments, you also have the option to exclude specific user groups, as well as using filters on your included groups to narrow down and filter out the accounts or devices that you do not want this policy to be applied to if you select to include a group that has more than just your intended targets.

Once you have selected your assignments you can move on to review settings, this will show you the configuration settings that you have put in place including the local groups you intend to target, what action you plan to take, and what identities you plan to target. You can also see your assignments from here to ensure you are applying to the correct users or groups. Once you have reviewed your settings and confirmed they are correct you can select save to start deploying your new policy

Once you have saved your policy it will start to deploy and apply the settings to affected devices when they next check in, which will vary in time from device to device however it will eventually take effect. You can review the user and device check-in status, and get a general report of the number of successful or failed applications of your policy. If you are finding many failed applications select the ‘Per setting status’ to be shown which particular setting in policy is failing and why.

If you wish to edit your existing policy to change which groups are being modified or perhaps the identities being added or removed you can do this by returning to the Account Security page, selecting the ellipsis on the right of your chosen policy select the policy you would like to adjust. Then scroll down the configurations section and select edit

You can then adjust any of the settings that you had put in place previously. One thing to remember at this stage is that if you previously used the ‘Add (Update)’ action on your policy, and you intend to remove the old identities and add new ones, you will need to change the action to ‘Add (Replace)’. If you do not do this you will simply add the new identities to the selected local group without removing the old members.

Should you add local admin accounts?

A very common question that would arise when a task such as adding local administrators to a device would be ‘Should we be adding local administrator accounts in the first place’. The short answer to this is, if it can be avoided or is not absolutely necessary then no you should not be adding accounts to be local administrators.

However there are circumstances in which it becomes a requirement to push out accounts to be local administrators to devices and that is where methods such as this are a very useful option, as it is far more secure to add an existing account to the local administrators group than to have the default administrator account on the device be used, as this is far simpler to identify and exploit. 

Another option for this is to deploy LAPS, which is something that can now also be deployed and managed through Intune with Relative ease, however will require some administrative time to recover the password for the device which may not be desirable.

Summary

Overall I believe that adding accounts as local administrators on a device should be avoided, as at the end of the day, you are adding more accounts that have the destructive power of an administrator that can be abused or misused. 

However if you are in a situation where it would be more efficient to add a specific group of users to be local administrators on devices that can be used to perform elevated tasks (preferably just IT Admins or trusted individuals) then using Account Security to add an existing Identity from your 365 tenant can be one of the most efficient and simplest ways to achieve this.

Account security is also a very effective method of replacing or removing accounts that are already present in devices’ local groups, so if you are onboarding new devices into Intune that are known to have accounts in local groups that are not desirable, this can be used to remediate those issues for the entire onboarding process and give you back control of these groups

Author: Curtis Cannon

My name is Curtis, I am a service engineer for an MSP. My focus is on specialising on Azure/Entra ID and other related cloud technologies found in the Microsoft 365 Suite. This content has been written from my own knowledge on the subject in question, and any opinions given throughout the post are mine and do not represent the opinion of others.

Related Posts