
In this post, we will be looking at how to implement and configure a Local Administrator Password Solution policy on your managed devices in Intune, using an account that is already present on the devices in question
Table of Contents
Prerequisites
LAPS management in Intune is very straightforward to set up and does not come with a large amount of configuration, however, you will need to ensure that the devices you want to apply this policy to are enrolled into Intune.
The other requirement is to ensure that the account you are planning on managing with LAPS has already been pushed out to your managed devices, this is because the LAPS policy does not currently provide a way to add a user account, however, this is something that will be added in the future.
If you are looking for a way to add local accounts to your managed devices please check the link below for a variety of possible methods:
https://traversecloud.co.uk/create-local-accounts-on-managed-devices-with-intune/
Enabling LAPS in Entra
Your first step towards getting LAPS in place is to ensure that Local Administrator Password Solution has been enabled in Entra ID, this is so that the passwords for your device can be stored and accessed through Entra.
To do this sign into your Entra ID portal and then go to Identity > Devices > All Devices > Device Settings
Once there scroll to the bottom of this page and find the setting that reads ‘Enable Microsoft Entra Local Administrator Password Solution (LAPS)’, and change this to ‘Yes’
Turning this setting on will enable the Cloud version of LAPS and allow the passwords for your Entra and Hybrid devices to be stored in Entra.
Creating a new policy
The next step is to simply start creating your LAPS policy, this particular policy is managed within the Endpoint Security > Account Protection page. Once there select the ‘Create Policy’ button at the top of the page to get started.
This will open the ‘Create a profile’ blade on the right of the page with several drop-down boxes. In the ‘Platform’ box select ‘Windows 10 and later’, and then in the ‘Profile’ box select ‘Local admin password solution (Windows LAPS)’, and then select ‘Create’ at the bottom of the blade.
You will then be taken to a new ‘Create Profile’ page, the first of which is the profile details page. Here you will need to provide a name for your policy and you have the option to provide a description.
While you can provide any name and description you want it is strongly advised you fill these in with information relevant to the policy you are creating, preferably mentioning the name of the account the policy will be managing, as well as what devices are being managed in the description.
Once done select ‘Next’ to move on to the configuration details.
Configuration settings
You can then start configuring the settings for your new LAPS policy, there are several settings available to configure, and what you select will depend on your security requirements so we will just cover what each setting does and a general recommendation for each.
First up is the Backup directory settings, here you will need to select where the local administrator passwords will be saved to. In this case, as we are planning on configuring this for Entra you should select to backup to Azure AD Only (they will likely change this to read Entra ID eventually).
Next is the Password Age, which will determine the maximum age of the administrator account password before it is changed, if you do not select to configure this setting it will be left at the default value of 30 days, if you enable this you will then see a text box to enter the password age into.Â
When backing up your password to Entra the minimum password age available is 7 days and can go up to a maximum of 365 days, I recommend setting this to 7 days.
The next setting is simply to name the account that you want to manage with this policy, if you do not specify an account in this section the default administrator account will be managed instead. This identifies the account using its Well-Known SID so it can still be targeted even if the default admin has been renamed.
If you do have an account that you want to be managed simply enable the setting and then enter the name of the account to be managed. As mentioned at the start of this post you will need to ensure you have created the account via other means as the LAPS policy cannot currently create the account for you.
Next up is the Password policy for the administrator account, here you can set the complexity requirements and the required password length for your managed accounts. This will vary depending on your password policy requirements.
For the complexity you have the option to select from:
- Large Letters
- Large Letters + Small LettersÂ
- Large Letters + Small Letters + Numbers
- Large Letters + Small Letters + Numbers + Special Characters
- Large Letters + Small Letters + Numbers + Special Characters (Improved Readability)
- Not Configured
Here I recommend selecting either ‘Large Letters + Small Letters + Numbers + Special Characters’ or ‘Large Letters + Small Letters + Numbers + Special Characters (Improved Readability)’. The latter of these options is the same as the first, however, it will not use characters that are commonly confused including:
- Large Letters – ‘I’, ‘O’, ‘Q’
- Small Letters – ‘l’, ‘o’
- Numbers – ‘0’, ‘1’
- Special Characters – ‘,’, ‘.’, ‘&’, ‘{‘, ‘}’, ‘[‘, ‘]’, ‘(‘, ‘)’, ‘;’
Then you can select the password length which determines how long every password managed in this policy will be, I will recommend a password length of 16 or higher
Finally is the Post Authentication options, which will determine what happens after the managed account has been logged in to using the password from Entra ID.Â
First is the Post Authentication Actions, for this, I recommend selecting either ‘Reset the password and log off the managed account’ or ‘Reset the password and shutdown’. These will ensure that the active sessions for the managed account will be terminated after use. If you do not select an option for this section it will default to ‘Reset the password and log off the managed account’.
Next is the Post Authentication reset delay, here you will select the ‘Grace period’ which is referred to in the previous options. Essentially this is the amount of time after the managed account has logged in that the Post Authentication Action takes place.Â
The maximum the delay can be set to is 24 hours, the minimum value is 0 which will disable the Post Authentication Actions altogether, and the default value for this is 24 hours. I strongly recommend changing this to something between 6-8 hours (or lower if preferred), this is to ensure that the Post Authentication Action takes place within an average workday.
Once you are happy with all of your settings and you are ready to move on select ‘Next’ at the bottom of the page. This will take you to the scope tags which you can add if they are in use.
The next page is the Assignments page where you will set which devices/accounts this policy will apply to, if you have existing groups to apply this to you can add them here. Alternatively, you can select to add all users or devices and you can then add device filters to narrow this downÂ
Select ‘Next’ once you are happy with your selected assignments to move to the final page which is the ‘Review & Create’ page. Here you can check over the settings you have implemented in this policy, if everything looks correct then you can select the ‘Create’ button at the bottom of the page to finalise and create the policy.
From this point, the policy will start managing the named account’s password when the device next checks in.
Accessing the passwords
Once your policy has been in place for a short while you will be able to recover the passwords for your managed devices from Entra. This can be done by going into the Entra ID admin portal and then going to Devices > All Devices > Local Administrator Password Recovery.
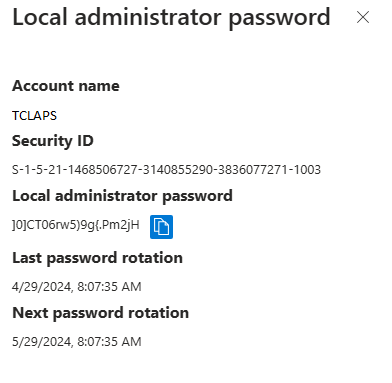
On this page find the name of the device that you need the password for and select the ‘Show local administrator password’ and this will open the ‘Local administrator password’ blade on the right of the page.Â
On this blade you will be able to see the device’s ID, it will also show when the password was last rotated and when it will next be rotated. If you select the Copy option it will copy the Administrator password to your clipboard.
You can also select the ‘Show’ option on this blade to reveal the password so it can be read off of the screen if required.
Once you have used the listed password to log into the local administrator account on the managed device it will then be subject to the post authentication actions if you configured them within the policy.
If you select the device name from the ‘Local administrator password recovery’ page it will take you to the device page in Entra. If you go to the same device within Intune you can manually rotate the managed admin account password by selecting the horizontal dots on the top right of the page and then selecting the ‘Rotate local admin password’.
Powershell Commands
There are also some PowerShell commands that can be used to acquire or reset the passwords managed in Entra, these use the Microsoft Graph PowerShell module, so you will need to ensure that this is installed before you can do this.
To manage the Device passwords with Microsoft Graph Powershell you will need to ensure you have the required permissions, the first is ‘Device.Read.All’ which will be required to get the Device ID attribute which will be used to search for the selected Device password.
The second is ‘DeviceLocalCredential.Read.All’ which is required to view the details and the password for the selected managed device. To connect to Graph with the above permissions use the following command:
Once you have connected to Microsoft Graph you will need to get the Device ID(s) for the devices you need to check the password for. You can get a list of your devices and the DeviceID using the following command:
This command will show a list of the Devices listed in Entra and the Device ID field which is required to get the LAPS details
Once you have found the device that you need the LAPS password for take note of the Device ID and then use that in the following command to get the details:
This will return the LAPS password details that would be shown within Entra, the ‘-AsPlainText’ switch at the end of the command is not required however if you choose to leave this out the password will be shown as a ‘System.Security.SecureString’. Â
Summary
Managing your Local Administrator account passwords with LAPS in Entra is a straightfoward process for an everyday security solution that should be used in every environment where it is feasible.
What is nice about managing this through Entra is that there are also very few requirements for this to be accomplished, simply ensuring that your devices are managed in Intune, and 2 simple policies to deploy the account to be managed and configure the password management.
You can then recover this password from the Entra Portal or even through PowerShell making using your Local Administrator account that much simpler.
Author: Curtis Cannon
My name is Curtis, I am a service engineer for an MSP. My focus is on specialising on Azure/Entra ID and other related cloud technologies found in the Microsoft 365 Suite. This content has been written from my own knowledge on the subject in question, and any opinions given throughout the post are mine and do not represent the opinion of others.
Related Posts
Sending Organisation Wide Messages in 365 Admin Center
In this post I will cover Organisations message in the 365 Admin Center and how they can be used to streamline notification delivery to end users.
Generate a Device Compliance Report Using PowerShell
In this post I will share a script I have created to generate a report of all managed devices compliance status which will help give you an understanding of which devices need remediating, removing, or have their policies adjusted.
Identify Unassigned Intune Policies with PowerShell
In this post I will share a script I have created to report on all unassigned applications in Intune
